We no longer support this browser. Using a supported browser will provide a better experience.
Please update your browser.
Get Started
Payment Links
Card Payments Online
Getting Paid
View Payment Activity
Manage Disputes
Make Changes in Your Account
Tax Information
Get started
If you have a Chase Business Complete Checking account, you can activate card payments through your Chase Mobile App or chase.com account.
Sign into chase.com, select the Chase Business Complete Banking account. Click “Accept Card Payments”. Click “Get Started” and follow the prompts to complete activation.
For instructions for activating in the Chase Mobile app, watch the how-to video above.
Some payments may be able to be manually entered through your chase.com account or in the mobile app. To process a payment with key entry, enter the card holder’s full name, full card number, expiration date, billing zip code and CVV code. The CVV is a 3-digit code found on the back of most cards. For American Express®, the CVV is a 4-digit code that is found on the front of the card.
For instructions for sending a payment link, select Payments links from the left-side menu.
For instructions for using Tap to Pay on iPhone, see Tap to Pay on iPhone section below.
After a payment is approved, the prompt to provide a receipt appears. Receipts can be sent by email or SMS/text.
We recommend you always send your customer a receipt and send a copy to yourself for record keeping. Your copy of the receipt can be required as documentation to content or resolve disputes.
Chase stores the your customers' contact information to send digital receipts quickly, speeding up the checkout experience. This information is collected during checkout at any Chase merchant.
Your customer can opt out at any time by clicking the Manage Receipt Options link found on the digital receipt.
You cannot access the customer's information, and it isn't visible during checkout. Details about data protection are available in our Privacy Policy.
No, you do not have access to customer details and the contact information is masked throughout the checkout experience.
Details about how we protect the data available in our Privacy Policy.
Yes, your customers can opt out at any time by clicking the Manage Receipt Options link found on the digital receipt.
You can also tap the link How did this contact info get here? and select the Don’t save option. This will delete existing contact information and prevent any details from being stored.
If a payment fails, you will be notified with an on screen error message. This happens for a variety of reasons, including:
If your service has been deactivated, you should receive an email with more information. If you do not receive an email or if you still need assistance, call us at 1-888-659-4961 for assistance.
If you are accepting payments in the Chase Mobile App, sales taxes are not automatically added to the amount. To add taxes, please calculate the appropriate tax amount and add to the total amount requested before processing the payment.
If you are accepting payments through your account on chase.com, select Card Payments Online in the left-side menu for instructions.
At this time, you can process international credit cards via card reader. For key-entry transactions in the mobile app and web browser, the card can only be processed with a US-based billing address.
Creating/Sending A Link
If you have already activated payment acceptance, and the send payment link option is available, payment links will automatically appear in the Chase Mobile app or your chase.com account.
To send a payment link from the Chase Mobile app:
To send a link from your Chase.com account:
Your payment link will be randomly generated. At this time, you will not be able to customize the payment portal page.
No, the customer must pay the total amount requested on the link.
No, links are one-time use only.
Fees are the same as for manual entry payments.
At this time only the primary users can see payment links.
Yes, you can select the “Add a tip” option when creating the payment link for your customer if you would like to accept tips. When your customer is completing the sale, they will have the option to add a 15%, 18%, 20%, Custom, or No Tip amount.
Tip amount limits:
Receiving Payment
Your customer will see a message that the payment is complete, and the link has been paid.
Note: You will receive an automatic email receipt for each transaction.
Verify that the correct contact information is entered for the customer. If the issue persists, attempt to send the link through an alternate method (e.g., text, email, etc).
Your payment link will last until your customers pays or up to 3 months. When the link expires, your customer will see a message to contact you for further information if they attempt to access the link.
Viewing/Tracking/Managing Links
Chase Mobile:
Chase.com:
Yes, you can filter by either link status or date created.
Click on the payment link to see the current status – sent, paid, or expired.
No, you cannot see if a customer has opened the link.
No, reminders are currently not available.
Yes, you can cancel a link by navigating to "See accepted card payments" in mobile or "Sales activity" on Chase.com and clicking on the link that you'd like to cancel. Only active unpaid links can be canceled.
No, you cannot save your customers’ contact information.
Adding Taxes, Tips, and Discounts
When adding a new tax rate:
When adding a new discount:
When adding a tip:
Total Sale = (Amount – Discount) + Tax + Tip
No, you will have add the tip prior to creating and sending the link to your customer.
No, you cannot. Taxes are calculated as a percentage of the total sale.
You cannot edit an existing transaction. You will need to issue a refund and create a new transaction.
No, only full refunds can be processed. For partial refunds, contact our Support Team for assistance.
No, these are optional features.
Getting Paid
Funds may be held for a variety of reasons, including protecting against fraud and exceeding deposit limits.
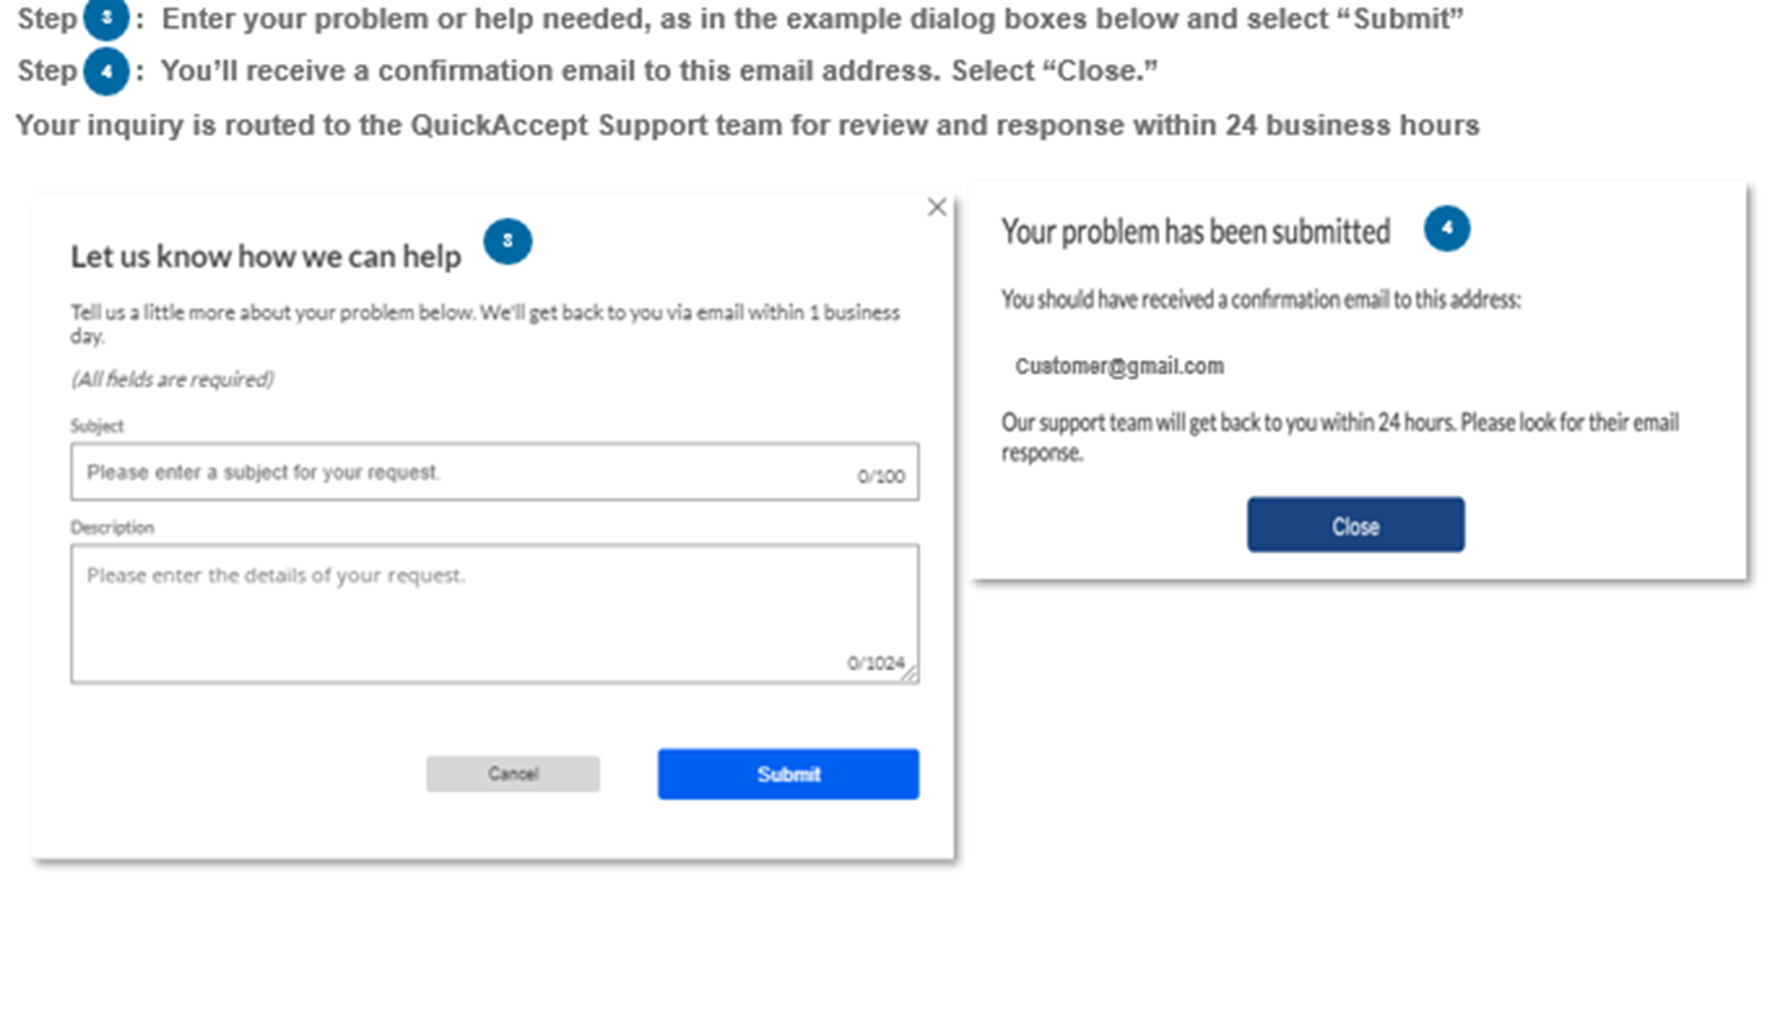
Fraud: To protect against fraud, some transactions may require additional validation. Chase may hold funds to review and ensure the transaction is legitimate. If you experience a funds hold, your transaction status will state “Pending – in Review” in your transaction history on chase.com or the Chase Mobile App. You may receive an email if additional documentation is required to verify the payment. The e-mail will come from WePay.com with the subject line “Additional information needed to resume payouts for your QuickAccept account.” This email will be sent to the email address used when you opened your account. If you have not received an email, please call us at 1-888-659-4961 or submit a ticket for additional assistance. To submit a support ticket, select the transaction and view details. Under view details select “Have a question” and complete the form. Be sure to use the email address used to open your Chase checking account.
Once the transaction is approved, Chase will deposit the funds into your account.
Deposit Limits: Limits are set at the account level and differ by a variety of factors. Funds may be held when the deposit amount exceeds a deposit limit set by Chase. Deposit limits cover potential chargebacks, returns, unshipped merchandise, refunds, and/or unfulfilled services and act as a buffer between the time payments are processed and the time you can access these funds, in order to mitigate the risk of making funds accessible immediately.
If you are depositing into a Chase banking account:
If you are depositing into non-Chase account:
If your payment has not been deposited according to the stated timelines, your transaction may be under review. Please reference the "Funds Hold" section for additional information.
Individual transactions may require additional information to ensure they are not fraudulent. This type of review protects you and Chase and can easily be resolved by you submitting a receipt when requested. If, on occasion, your weekly payments exceed a threshold established for your business, Chase may hold the funds amount over the threshold to validate activity. This happens very rarely.
If you have further questions, go into your transaction history, select the transaction and view the details. Select Have a question and complete the form. Be sure to use the email address used to open your checking account.
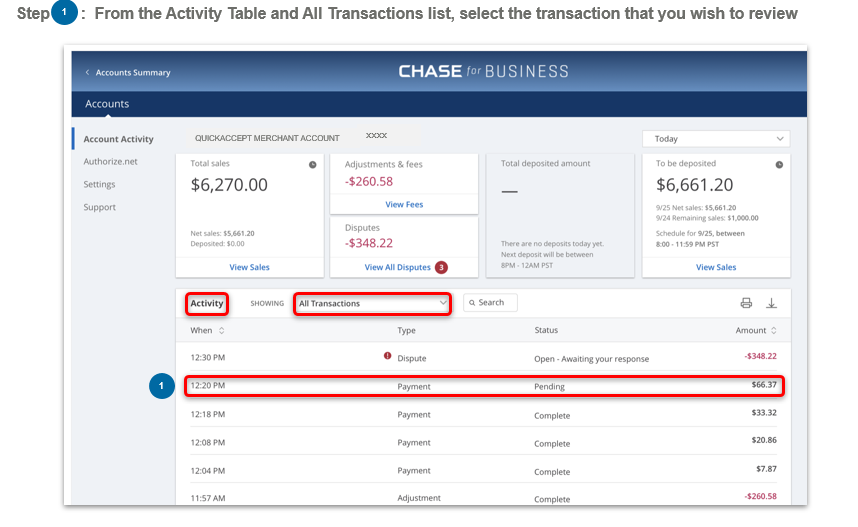
View Payment Activity
View your transaction history on your Chase Mobile® app or in your chase.com account. Transactions should appear shortly after submission.
Viewing with the Chase Mobile app:
Viewing through your chase.com account:
Refunds can be issued directly from your chase.com account. You can only refund a payment that’s less than 60 days old. Once a refund has been issued, it usually takes 3-7 business days to credit the customer’s account.
Follow these steps to refund payments:
Refunds must be $1.00 or more. Amounts less than $1.00 will not be processed.
All processing fees will be returned for a full refund. For partial refunds, the processing fees will not be returned
Yes, you can refund more than one refund until the total value of the transaction has been returned. However, please note, all refunds must be $1.00 or more.
If you do not see the option to refund, 1) there is no remaining amount to refund (see the transaction history within the details) or the transaction was completed over 60 days ago and can no longer be refunded.
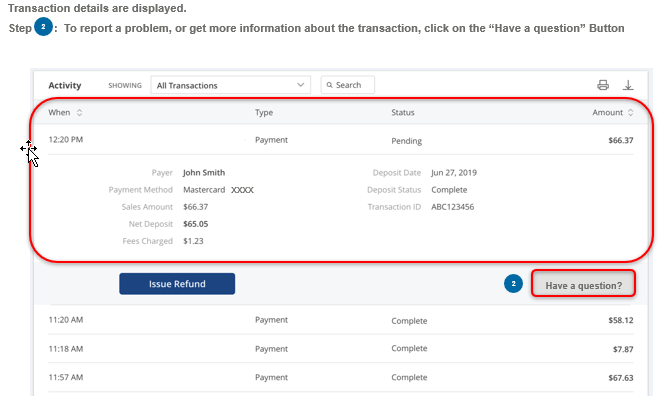
Yes, in the transaction detail view, select Send receipt, then select Email or Text. Add the customer's contact information, then select Send. You will see a confirmation screen. Select Close.
For each transaction, fees are subtracted from your total before you receive your deposit. No additional transactions fees will be charged at the end of the month. To see the deposit amount and any adjustments and fees, go to the transaction history screen, select the transaction, and view the details.
Review your deposit details, fees, adjustments, or disputes related to your card payments from full transaction history in your chase.com account. Select the transaction to view details for a specific transaction.
Manage Disputes
A dispute happens when a customer formally reports that a charge on their card was not legitimate. When a customer disputes a charge, the customer’s payment is reversed while the case is being reviewed. Disputes are initiated by the customer via the bank that issued the card. Your customer may have filed a dispute because they:
You will be notified when a dispute claim has been made and we don’t have the documentation needed to challenge. You have a limited time to submit proof that the charge was legitimate. Because of the time sensitivity, it is best to monitor your account online frequently. Most card networks allow customers to dispute payments for up to 120 days after the transaction took place, in some cases up to 540 days. American Express® allows customers to dispute payments at any time.
We notify you of the dispute via email. You can also view the dispute in your transaction history. When a customer disputes a charge made on their card, the bank that issued the card credits the cardholder and the payment brand credits the issuing bank. The disputed amount is temporarily deducted from your next settlement while the claim is being reviewed. If there are not enough funds in your next settlement, the amount is deducted from your bank account.
View the status of your dispute in your transaction history on chase.com or Chase Mobile. You will receive an initial e-mail notification informing you of the dispute details. Carefully review the information contained in the notification email, particularly the dispute type. You may be given the option to contest or concede the dispute. If you accept responsibility for the dispute, click “Concede.” The funds will not be returned to your bank account.
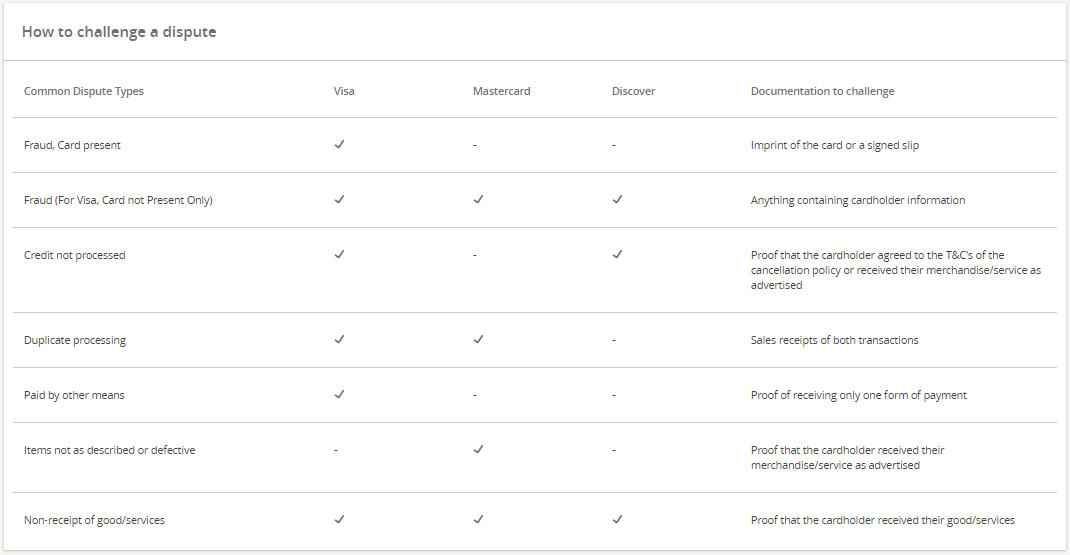
If, however, you challenge the dispute, you need to provide supporting evidence that the good or service that you agreed to provide to the customer was carried out as intended. Please consult the guide below to determine what documents you need to submit for the most common dispute types.
From the day that you receive your dispute notification, you will have five business days to submit your evidence. This window ensures that Chase has sufficient time to present the evidence to the cardholder’s bank and/or card network within their allocated timeframes. We evaluate late submissions on a case-by-case basis and submit accordingly.
Once you have gathered all of the documents, click the “Contest” button and upload your documents. Please keep in mind that there are size limitations on files, so you may want to submit screenshots. For instance, if you submit your refund policy but the file size is too large, take a screenshot of the page with the cardholder’s signature. Chase currently accepts JPG, JPEG, TIF, TIFF, PNG, and PDF (preferred) files. For each dispute, submit up to five files, 1MB per file. If you have multiple picture files that exceed the combined size limit, compress each individual file and upload again.
Once Chase receives your response and supporting evidence, we will challenge the dispute with the cardholder’s bank on your behalf. If you win the dispute, Chase releases the disputed funds back to your bank account in the next settlement and your confirmation will be sent. Due to timelines for card networks and issuing banks, the dispute can take up to 45 days to be resolved.
You will receive an email from us when the dispute is resolved.
Make Changes in Your Account
Additional users can be added in your account settings. You will need to enroll in the Access and Security Manager in order to get started.
In the Chase Mobile App, tap the profile icon on the top of the screen, then select the Settings tab, and Security settings.
To enroll in the Access and Security manager and add users via your chase.com account, watch the video.
In the Systems Administrator view, select your account.
If you accept card payments through your banking account:
a. Accept payments on Chase Smart Terminal (Enables payment acceptance on Smart Terminal only)
b. Accept payments on Chase.com and the Chase Mobile app (Enables payment acceptance on both Chase.com and the Chase Mobile app)
c. See & refund transactions on Chase Smart Terminal (Enables viewing and refunding transactions on the Smart Terminal)
If you accept card payments through your Chase Payment Solutions account:
a. Accept payments on Chase Smart Terminal (Enables payment acceptance Smart Terminal only)
b. Accept payments on Chase.com or the Chase Mobile app (Enables payment acceptance on both Chase.com and the Chase Mobile app)
c. See & refund transactions on Chase Smart Terminal (Enables viewing and refunding transactions on the Smart Terminal)
d. See & refund transactions on Chase.com or the Chase Mobile app (Enables viewing and refunding transactions on both Chase.com and the Chase Mobile App)
Select Next to review changes, then Submit to complete the changes.
If you are accepting payments through your Chase Business Complete Banking (CBCB) account, card acceptance will not be available for use once you close your CBCB account. If you have a CBCB account, you can stop processing payments at any time. Card acceptance is offered at no additional charge. You will only incur fees when you process debit or credit card payments.
If you are accepting payments with a Chase Payment Solutions account, you can close your account through the Chase Mobile app or Chase.com.
Tax Information
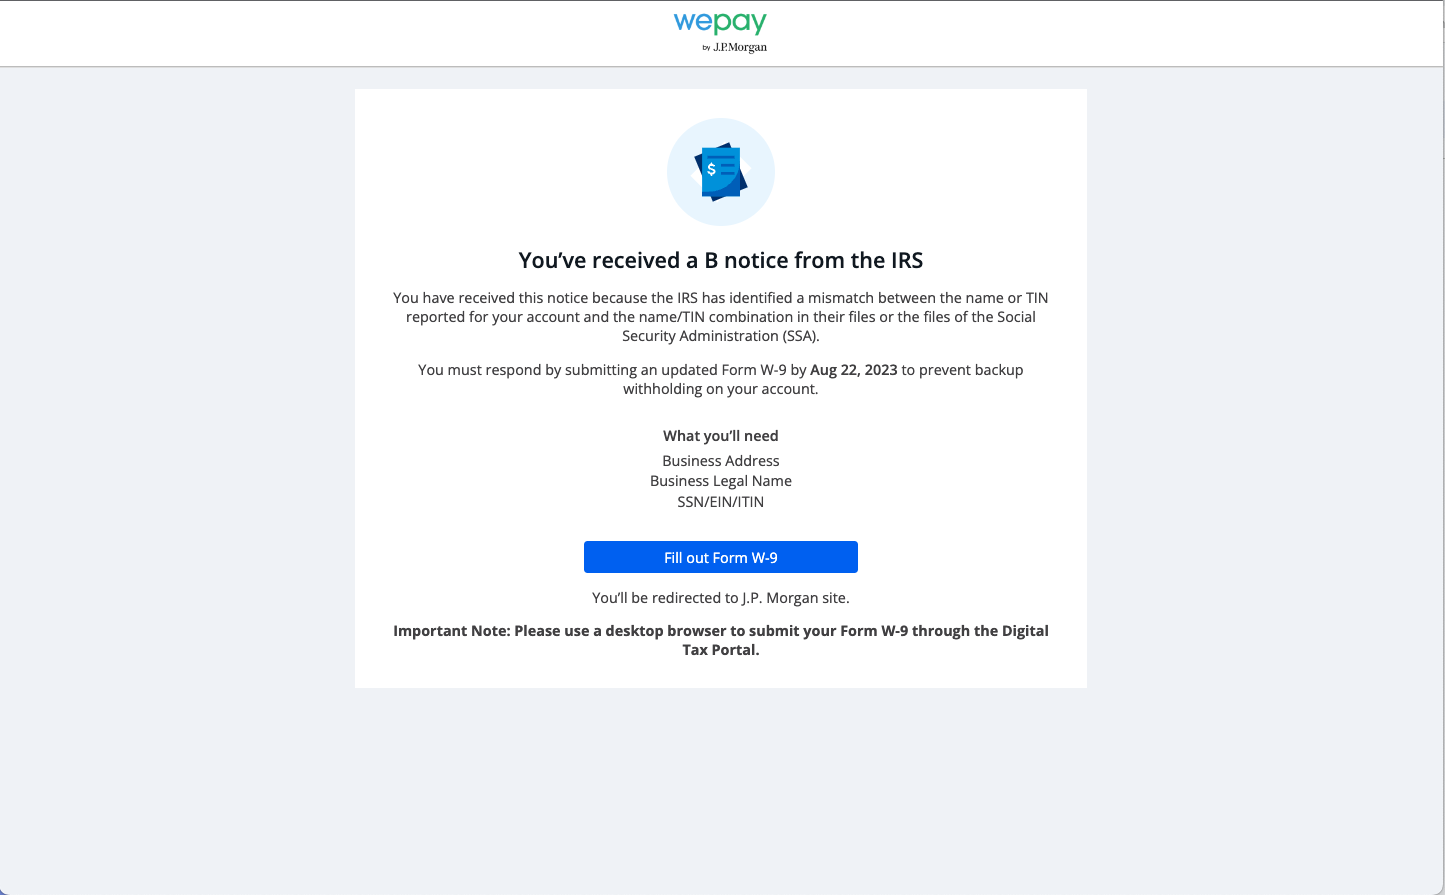
A B-Notice, also known as CB2100 or CP2100A notice, is an official communication issued by the Internal Revenue Service (IRS) to inform a payer that the taxpayer identification number (TIN) provided on a tax form, such as a Form 1099, does not match the records held by the IRS. The B-notice serves as a notification to the payer that there might be an error or discrepancy in the taxpayer’s TIN and/or Name match.
To submit the W-9 through your chase.com account:
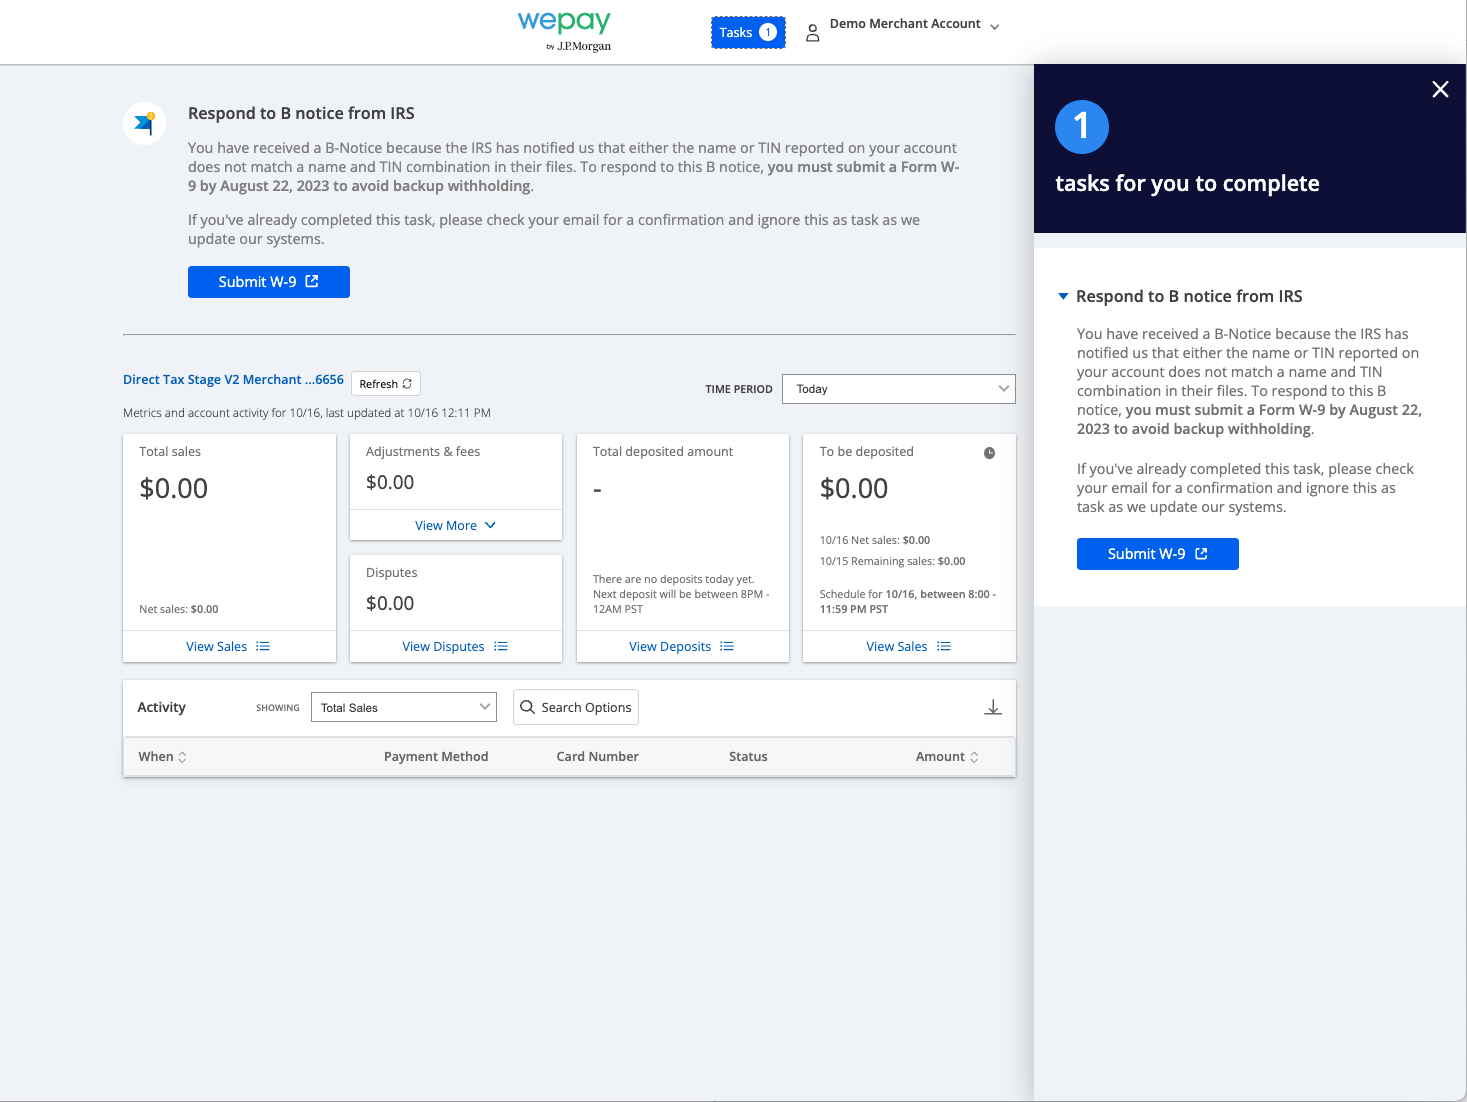
a. The banner notification will include information regarding the B-Notice and the date you’ll need to submit a Form W-9 by to avoid backup withholding.
b. If backup withholding has already started on your account, you will see a banner notification that provides the date the backup withholding started and a link to Submit W-9.
Form 1099-K is the IRS’s information return for reporting payment transactions. It reflects the gross dollar amount of transactions you processed with us in the previous calendar year. In addition, the IRS 1099-K form should reflect your legal name and Taxpayer Identification Number (TIN). It is up to you (and your tax professional) to determine whether these amounts represent taxable income.
If you process more than $600 in transactions in the calendar year, you will receive the 1099-K form by January 31 of the following year. The form will come from WePay, a Chase company. All payment processors are required to issue the 1099-K form by law. WePay is also required to file a corresponding tax form with the IRS, which participates in a combined filing program with many state tax agencies, and with some states directly
Yes, these thresholds apply to all US-based businesses including non-profits and other tax-exempt entities. The 1099-K form will be sent with the name and Taxpayer Identification Number (TIN) of your business or non-profit, rather than the account’s administrator’s legal name and social security number.
In other words, if you are an administrator of an account for a business or non-profit, please make sure you input the correct name and employer identification number for the business or nonprofit.
When determining whether you have processed more than $600, refunds, fees, chargebacks and other items are disregarded according to the tax law. Gross payment volume is determined by the amount of money your customers originally paid.
It is up to you (and your tax professional) to determine whether the amounts reported on the form represent taxable income and how to report your business activity on your tax return. For help understanding your 1099-K go to IRS.gov
Non-US merchants are required to certify their foreign status to be exempt from 10999-K reporting. Certification remains in effect for 3 years and must be renewed.
Tap to Pay on iPhone
Preference Settings
Overview
With Tap to Pay on iPhone, you can accept all types of in-person contactless payments right on your iPhone - no extra readers or hardware needed.
You can accept all contactless payments types, including credit and debit cards, Apple Pay, and other digital wallets.
You can accept all major card networks using Tap to Pay on iPhone – Visa, Mastercard, American Express, and Discover.
If you have a Chase Business Complete Banking® account or Chase Payment Solutions℠ account, you can enable Tap to Pay on iPhone in the Chase Mobile app® with no application required to begin accepting contactless payments.
There are no additional fees for merchants to use Tap to Pay on iPhone.
Our contactless card processing rates for transactions using Tap to Pay on iPhone is 2.6% + $0.10 per transaction.
No, your customers do not pay any fees when you accept payments with Tap to Pay on iPhone.
Tap to Pay on iPhone is available with the Chase Mobile® app in the U.S.
Getting Started
For additional references, see the best practices page.
You can provide your employees with access to Tap to Pay on iPhone by providing them authorized user access to your bank account. Follow the instructions above in the main side navigation under "Make changes in your account".
Transactions can be managed in the same way as the other payments accepted through the Chase Mobile® app.
For card payments, present your iPhone to the customer and ask your customer to hold their card horizontally at the top of your iPhone, over the contactless symbol. When you see the “done” checkmark, the checkout is complete.
For Apple Pay and other digital wallet payments, present your iPhone to the customer and ask your customer to hold their device at the top of your iPhone, near the contactless symbol. When you see the “done” checkmark, the checkout is complete
Please see the images below on how to position the iPhone to accept a contactless payment. If you need more help, view this Apple support page, for more details.
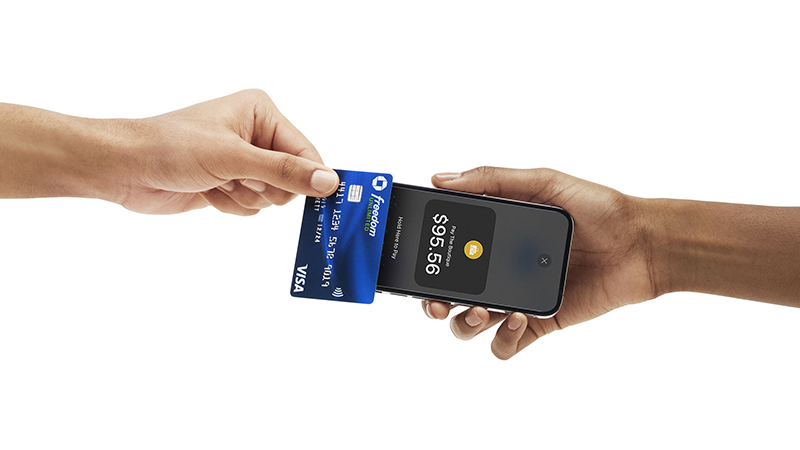
Card payments
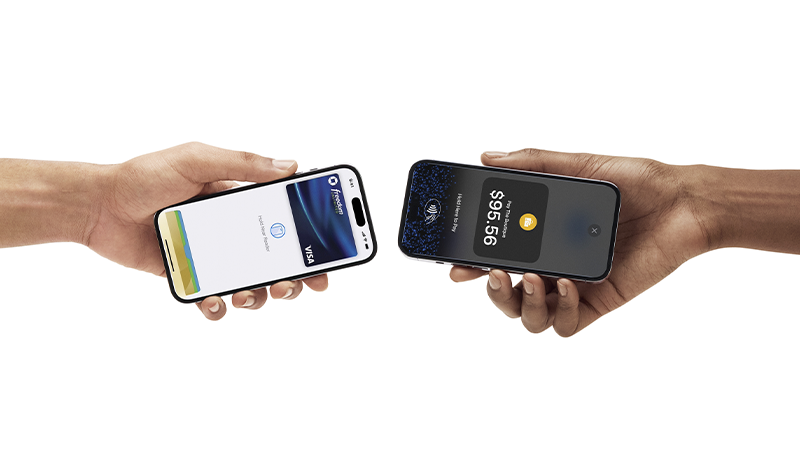
Apple Pay and other digital wallet payments
Some payment methods perform better at sending payments than others. Digital wallets send payments the fastest. Some card designs and materials, such as metal cards, are less effective at contactless payments. If the physical card payment is not being detected, ask the customer to move the card or device slightly around or reposition on the iPhone.
Find more answers about Tap to Pay on iPhone on Apple’s FAQ page.
Compatibility and Requirements
Tap to Pay on iPhone runs on the latest iOS version.
Tap to Pay on iPhone is only available on iPhone.
In addition to a supported iPhone, a supported version of iOS and the Chase Mobile® app, you need an Apple ID account to activate Tap to Pay on iPhone for your business.
The Chase QuickAccept℠ feature must also be enabled on your Chase Business Complete Banking account in the Chase Mobile® app. If you do not have Chase QuickAccept℠ enabled, follow the steps above.
Yes, Tap to Pay on iPhone is also available on the Chase POS app.
Tap to Pay on iPhone requires either Wi-Fi or cellular data to work. We recommend using Wi-Fi when possible for a smoother customer experience.
Yes, Tap to Pay on iPhone can be used in addition to your existing point of sale solutions for in-person payments.
Tap to Pay on iPhone uses the built-in features of iPhone to keep your business and your customer data private and secure. When a payment is processed, Apple does not store card numbers on the device or on Apple servers, so you can rest assured knowing your business stays yours.
Tap to Pay on iPhone does not have a noticeable impact on battery life.
Yes, you can create and manage settings for your taxes, discounts, and receipts through your chase.com account. These can be selected and applied to your transactions during checkout.
For discounts and taxes you can create presets by percentage of the sale or dollar amount.
If you have multiple card payment accounts, you will need to create and manage settings for each account individually.
At this time, settings and preferences are managed at the account level. You cannot create different settings for each channel or device you use to accept card payments.
Yes, you can create multiple settings for taxes and discounts. During checkout, you will be able to select one tax and discount to apply to your transaction.
Settings management is only available to the account owner. Sub-users cannot change account level settings at this time.
No, settings created on another device will be visible in your account on chase.com. You can edit or delete your presets as needed on chase.com. All changes will be reflected across your account.
If you have presets that are not displaying, exit the settings tab and return or refresh your browser.
If your edits are not saving, exit the settings tab and return or refresh your browser.
Tax Settings
Yes, you can create multiple tax rates and save them to your account. However, at checkout, only one tax rate can be applied to the transaction.
When adding a new tax rate:
When editing a preset:
Yes, find your discount from your list of presets.
To edit:
To delete:
Discount Settings
No, only one discount can be applied per transaction.
Yes, find your discount from your list of presets
To edit:
To delete:
No. At this time, preset discounts can only be added during checkout.
Receipt Settings
No, at this time logos and images are not support.
Legal business name is required for all receipts. If you would like to add another business name, e.g., DBA name to your receipt:
No, but you can automatically send yourself a copy of your receipts. Check Send a copy of receipt to [address on file]. This will send your receipts to that address on file when you created your account.
This will automatically send a copy of each sales receipt to your email address on file.
Receipts will be sent to the email address used to create your account. To see where your email addresses are being sent:
If the street address is not correct or you would like to change the street address on file, please reach out to our Support Team or your local branch.
Chase QuickAccept® is not available in U.S. territories or outside the U.S. Usage of Chase QuickAccept is subject to eligibility, terms of service, monitoring and further review. Deposits are subject to limits, verification, fraud monitoring and other restrictions. Message and data rates may apply.
For questions about your Chase QuickAccept and Card Payments, contact our customer support team at 888-659-4961, or explore other card payment support topics.
For information about our complete suite of solutions, visit our homepage.

Learn about your business checking account with built-in card acceptance.
Chase's website and/or mobile terms, privacy and security policies don’t apply to the site or app you're about to visit. Please review its terms, privacy and security policies to see how they apply to you. Chase isn’t responsible for (and doesn’t provide) any products, services or content at this third-party site or app, except for products and services that explicitly carry the Chase name.